Wednesday, August 31, 2011

Hambo Hoedown #31

Happy Hoedown, once again!

The challenge this week is to add dimension.  I thought about this for a while. I decided to make a sliding/spinning card--one that uses a pop dot sandwiched between two pennies. 

Many moons ago I remembered seeing these sliding/spinning cards.  I always thought I'd give it a try....never did.  For some unknown reason this type of card popped into my head when I thought of dimension.  I searched online and found some videos on how to assemble one. 

Here is my card for this week's hoedown.

This is a really fun card!  Alien Spaceship Man does flips! :)

Here is a quick video!  My first blog video....awwww!


When I showed my kids the card, they scolded me for using pennies.  They want to take the card apart for the pennies.

Supplies Used:
Stamps:  Hambo Stamps-Alien Spaceship-digi
Embossing Plate-PTI-Sunshine Plate
Paper-Scenic Route
Stash-sandpaper, exacto knife
Dies-Spellbinders Nestabilities-Scalloped Oval

Monday, August 29, 2011

MIM #30

I had fun with this card.  I had no real plan or organization.  LOL! 
To read all about this week's Make it Monday Challenge click here.  Since I don't have Copics (yet), I had fun playing with my colored pencils. 
Enjoy your day!
Supplies used:
Stamps:  PTI-Friendship Jar Fillers, Friendship Jar, Mat Stack 4 Collection, Garden Of Life
Dies:  PTI-Jar Label, Mat Stack 4
Impression Plate:  PTI-Sunshine Impression Plate
Template:  Hot Off the Press-Fold-it Bows

Friday, August 26, 2011

The "I Dunno" Bag

Well, it all started out that I was going to get rid of a bag (it was a freebie from a cosmetic promo years ago).  It didn't look so swell any longer.  But as it was about to go goodbye...I thought "HEY! I'll just rip out that zipper.  I always need zippers!"  So, as I was ripping off the zipper and a few other hardware items, I noticed that the inside of the front of the bag ( hidden behind the liner) was kind of fun.  It was in better shape than the outside of the bag.  Then, my mind went to "I wonder if I could make a flower out of that?"  So, I pulled out my die cuts and sure enough!  I was able to make a flower.  Then I thought "hummmm, I wonder what kind of bag I can make from this."  So, I set about to make a bag.  I didn't really have a plan or really any idea what to make.  As I was cutting I kept thinking "hummmm, what should I make?"  I know, not necessarily the order that one should go about things but, well, you know...?... But I did have a new  non-stick sewing foot I was dying to try out and a zipper from another scraped item.  So, I set about to make a bag.  For what?...you may be asking.  Well, I really don't know...
 I was sewing it together and then I thought "Hey!  I'll put a pocket on the front."  And so I did...
Yep, even the black part of the flower was recycled from the old bag.  The inside is even lined with the plastic from the original bag. 
So, what does one use this bag for? I dunno.

**UPDATE**

I decided to put the handles from the old bag onto the new bag.  Also, my daughter claimed this bag. :)


UPDATE #2
Here is a picture of the inside of the bag.  Sorry pic. is not great.  There's not much on the inside...just a burgandy colored plastic lining.  No pockets...I thought of those after I was done.  LOL! 

Wednesday, August 24, 2011

Hoedown #30

Oh Happy DAY! 
Must mean it's Hambo Hoedown DAY!
I don't know why, but a simple pencil image can make me happy.   Ya'll know how much I love all of the Hambo Stamp's--well, stamps.  So, it's probably no surprise that this week's Pencil-digi stamp made me happy. 
This week I decided that I'd dust off my scrapbooking skills.  I haven't scrapped a pic. in quite some time. 
Since the challenge is to make a school themed project, I made a first day of school layout. 
Supplies:
Stamps:  Hambo Stamps-Pencil-digi, Cornish Heritage Farms-Lined Paper
Dies:  Sizzix-Playground Alphabet, Sunset Alphabet
Patterned Paper-Cosmo Cricket (the rest are scraps that I've had for years...I don't remember the co.)

Tuesday, August 23, 2011

Zippy Wallet

It was the evening before the first day of school and DD came to me needing a wallet to put her money in.  She wanted something that had a zipper.  I didn't have anything for her to use, BUT I did remember seeing this awesome Zippy Wallet tut!  She dug through my stash of fabrics and pulled out the scraps she wanted me to use.  We hoped that I had a zipper that would look decent.  This is what we came up with:
The silky pink fabric lines the inside of the pocket and inside the zipper pocket. 
OK, I'll admit it, I don't know why....but I don't like to cut zippers.  I know...seek help!  :)  So, the only change I made (beside the flower accent) is I made it a little wider to fit my 9 inch zipper.   I was also in a hurry and didn't really read how to put it together...I looked at the pictures and hoped for the best.  I did have to rip out every single stitch line for one stupid oops or another.  So, perhaps reading the instructions would have been helpful.  But, in the end, it turned out great!
The flower was made from scraps with fray check on the edge to help keep it from unraveling.  The leaf is cut from green wool felt.  I had originally cut it out when I was working on this project.
I think if I were to make this again...given my zipper cutting hang-up...I'd also make it a little taller so that the bills could be put in without being folded...this one is just a tiny bit too short.  If you search on the tutorial writers blog you'll also see another great zippered clutch (I'll be making that one soon :) )that I'm guessing was designed more for that purpose...this one was meant to be small.
This is a wonderful, easy, quick tutorial.  I'd think this would also be a fun way to give  money or a gift card...maybe add a key ring, a small O or D ring,  or clip? 
Enjoy your day!

Sunday, August 21, 2011

Reversible {Lunch} Bag

This was a very quick easy project.
 I had this brown and blue polka-dot plastic/vinyl.  It is exactly like those flannel backed table cloths.  :)  I thought it would make a great lunch bag.  So, I used this Martha Stewart Reversible Purse pattern.

My daughter is always leaving her lunch bags at school so we have to keep several on hand.  :)

Thursday, August 18, 2011

Hoedown #29

Happy Hoedown!
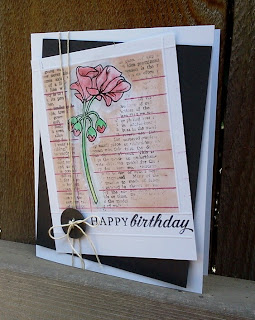
This week's challenge is to score! :)
To Make this card, I printed the Hambo Stamps image Geranium-digi onto white cardstock.  I then took out my Martha Stewart Scoreboard and scored the lines to make a box around the printed stamp and the sentiment strip(below).  I then masked the geranium and the square area inside the score lines and stamped using Cornish Heritage Farms-Vintage Text and Purple Onion Designs-Ledger stamps.  I also rubbed brown ink in the square.  I removed the masks and colored the geranium and stamped Happy Birthday sentiment from PTI's Enjoy the Ride set.  I die cut a button from PTI's Button Die #1.  I wraped some crochet thread around card and tied a bow through button. 
Whew!  What a week....and there's more to come! :)  I'm READY!  Bring it ON!...but can I have a nap first?  :)
Enjoy your day!
Supplies Used:  See above!

Friday, August 12, 2011

Everything Wristlet

I don't know what it is about wristlets, but I love to make them.  Until recently,  I never really used them. 
The pattern for these wristlets came from the book "Style Stitches" by Amy Butler.   The pattern is called the Everything Wristlet. It includes patterns and instructions for two sizes.

smaller version
 The smaller one I was able to use scraps for the outside.  Since the inside is mostly made from one long piece of fabric folded and sewn, I had to use a bigger piece of fabric. 
larger version

inside
The inside is pretty cool!  Both sizes contain card slots on both sides of an interior divider pocket (in the center).  The larger has a seam down the middle for two rows of card slots.   There is also a zipper pocket in the back. 
This is a pretty handy little bag.  The only thing I might add,  if I were to make this again, would be a pocket--maybe in the back--for sunglasses. 
The instructions for both sizes of wristlets are written together.  For the most part it was clear enough, but I did get confused in a few areas. Usually, Amy Butler patterns are very detailed with lots of illustrations and very easy to understand.  While there are illustrations and lots of detailed instructions, it did get a little confusing.  I had to re-read instructions several times to understand.  But, eventually I got it.  I still don't fully understand how to sew in the top and the bottom of the zipper because I couldn't reach all the areas needed to be stitched without sewing the pocket closed.  Also, when I made the larger wristlet, the measurements were off for the card slot section.   My other--well, I guess--issue, was OMG it is a pain to stitch the inside and the outside together.  But, I do LOVE the inside and outside design of the bag and I couldn't think of an easier way to put them together. 
I have made two styles of bags from this book.  Some of the bags I'll probably never make.  BUT, never say never, right?  I do feel that the book is an excellent value for what you get.  I'm not disappointed in my purchase.  There are a few other patterns from this book I'd like to try.
Here is the post of the other bag I've made from this book.

Wednesday, August 10, 2011

Hoedown #28

Happy Wednesday!  It's Wednesday!?!?  That means it's HOEDOWN TIME!!
Click here to read all about this week's sketch challenge.
 
This cute stamp is the Hedgehog-digi, another awesome image from Hambo Stamps.
 "Summer" is almost over in this neck of the woods. The kids go back to school next week.  This summer has passed quickly...must be all the fun Hambo challenges keeping me entertained.  :)
Enjoy your week!
Supplies Used: 
Stamps:  Hambo Stamps-Hedgehog-digi
Tag-stash
Dies-Spellbinders Nestabilities-Scalloped Square, Square
Embossing Folder-Cuttlebug-dots
Patterned Paper-DCWV-La Creme

Saturday, August 6, 2011

Wrist Pincushion

Can you believe that I didn't have a wrist pin cushion?  Well, I didn't until now!  I wanted one... never thought to buy one of those uncomfortable plastic ones.  I've seen several patterns to make one. I mentally put those on my list of things to make...never got around to it.  Then, I was reading this post.   I knew what my wrist pin cushion was going to be and it moved to the top of my list.  I started this project with the idea that I was going to make mine like hers but with the felt scraps I had.  I also wanted this to be a quick project.  I cut out one of the leaves from the provided pattern and thought..."ya, I don't have the mind set for this today." So, I thought I'd put my card making/scrapbooking supplies to good use and speed up the process. 
Here is what I came up with:
For the band I measured my wrist and added for overlap with the Velcro strip.  The green strip is 8" x 2" and the pink is 8" x 1.75".  In the instructions she suggested using a wooden disk between the band layers.  I knew dh would have something in the garage, but he wasn't home and I wanted to get this done.  Also, the garage is just plain frightening. :)  I tried to think of various options for this disk. Finally,  I spotted an unused wooden paint stirrer.  I measured about 1" and cut it with a blade.  It works!  I layered it between the band pieces and top stitched them together.  I then sewed my velcro on the bottom of one end of the band and the top of the other end of the band.  (see pic)

For the big green leaves on the bottom I cut my wool felt with the larger die from Paper Trey Ink's Bloom Builders #2 Die set.  I gathered it into a circle and tied it off. 
I cut a large circle of pink felt using a QuicKutz nesting flower die--it's scalloped and you won't see the edge of this circle but I don't have a regular circle die.  I did a gathering stitch all around the circle and gathered it a little then stuffed it with fiber fill then pulled it tighter and tied it off.  I whip stitched this to the die cut bloom builder die-cut then stitched all this to the band. 
I die-cut several large rolled roses and the medium rolled rose using My Favorite Things Rolled Roses dies.  I rolled them up and then glued them using Fabri-tac glue.  I then glued the flower to the stuffed mound.  I know that there are places where there is glue and the pin won't go through but that is ok...there are enough other places to stick the pin on the cushion.  If this glue issue bothers you you could take the time to hand sew everything. 
Enjoy your day!

Wednesday, August 3, 2011

Hambo Hoedown #27

Tic Tac Toe!
What a fun challenge....and this was a challenge for me today.  I struggled with this one.  To find out about this week's Hambo Hoedown Challenge click here.
Once again, I was unable to decide which way to go.  So I first made this card:
For this card I used ribbon, eyelets, and punches
Then I made this tag:
On this tag, I used Die cuts, flowers, and piercing.
Supplies used:
Card
Stamps:  Hambo Stamp's-Little Indian, Stampendous-Warm Wishes
Ribbon-stash
Eyelets-stash
Punches-Stampin' up-ticket corner, and not postitive on the name...paper punch maybe?
Tag:
Stamp:  Hambo Stamp's-Little Indian
Die Cut-Sizzix- Leaves, MFT-Rolled Roses
Piercing template-Li'l Davis Designes-Li'l Stitchers Tag
Punch- Marvy Uchida-circle punch
ribbon-stash

Monday, August 1, 2011

MIM #26-Decreasing Apertures

Happy Monday to everyone!
Whew!  I made this card for a birthday that is TODAY!  I don't have to put this in the mail.  So, I went ahead and made a square card.  I also took this opportunity to participate in this week's Make It Monday #26 Challenge.  :)
I finished with perfect timing...I just pulled the cake from the oven.  It is cooling as I type.


Honestly, for this card I just grabbed my stash of scraps and started die-cutting.  I didn't really pay attention to color or pattern.  Can you tell?  I also just grabbed whatever ink colors that were nearby.  I sort of tried to match.  But, I wasn't being particular. 
This technique is so much fun.  I so enjoy learning new (to me) things.  :)
Enjoy your day!
Supplies Used:
Stamps:  Paper Trey Ink-It's A Celebration
Dies:  Quickutz-Scalloped Nesting Flowers
Punch:  Stampin' Up-Ticket Corner
Patterned Paper:  Scenic Route-?, DCWV-La Creme Stack, Cosmo Cricket-?